After inserting the text and animation as explained in tutorial part 2, the next step is to apply animations to the objects in the signature.
In this part, the most important panel is the Timeline panel as highlighted in the yellow rectangle. You can resize the height of the Timeline panel by dragging the lower border to your desired height.
Select the object you want to apply the animation to. For this tutorial, only the texts will be animated, because the imported animation is already.... well, animated. Notice that there are two text objects there. When one is selected, the corresponding text row in the Timeline panel will also be highlighted.
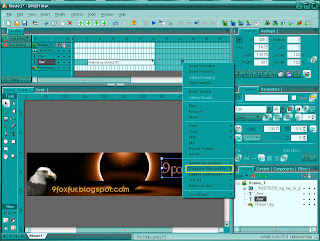
To apply the animation, select which frame you want the animation to start playing on the selected Timeline row. For this tutorial, frame 6 is selected, which means that the animation will start playing on frame 6. Right click on frame 6 and the effects menu will appear. To start the animation, select Appear into position as highlighted in the yellow rectangle.
These are the effects available in the Appear into position menu. Choose whichever you want. For this tutorial, the effect Implode up slowly is selected.
Click the Play Effect button as highlighted in the yellow rectangle to preview the animation applied on the text.You can adjust the length of the effect by dragging the right side of the effect rectangle. The next step is to insert the effect that will end the animation on the object.
Right click on the frame where you want to end the animation. Spare some frames in between to allow the object to appear static on the signature (in case of text, to allow the text to be read). The effects menu will appear. Select Disappear from position as highlighted in the yellow rectangle. Choose whichever exit animation you want.
Preview the animation by clicking the Play Effect button. Adjust the effect to the desired length.
Repeat the steps on the other objects. Notice that the imported animation (the eagle in this case) will appear from the start of the movie to the end because no entry or exit effects are applied on it. Try experimenting with other effects such Fade, Zoom, Slide, Looping continuously et cetera until you are satisfied with the result. The next step is to insert hyperlinks and export the movie.


0 comments:
Post a Comment